fbpx

Medicare Claim Forwarding to Secondary Insurance

Navigating Medicare Insurance Claims: Ensuring Seamless Forwarding to Secondary Insurance & the GA Modifier

Navigating the intricate world of insurance billing, particularly when dealing with secondary insurance claims and Medicare, can be quite challenging. For healthcare providers and administrative staff, understanding the correct processes is essential for seamless claim submissions. This helps maintain efficient operations and minimizes the risk of lost income.

One common situation is when Medicare Part B is the patient’s primary insurance, but you know Medicare will likely deny the claim (we hope to explore this more in a future blog). Despite this, the secondary insurance requires Medicare to process the claim first before they will consider it. This can happen if the secondary insurance policy stipulates that they only cover what Medicare does not. In these cases, it’s crucial to ensure the claim is submitted to Medicare properly so it can be forwarded to the secondary insurance automatically. This process ensures that both insurers are aware of the services provided and can coordinate their payments appropriately, helping to avoid any gaps in coverage or unexpected bills for the patient.

At Kalix, we understand these complexities and strive to simplify the process for you. Our EMR system offers robust insurance billing functionalities designed to streamline your workflow, reduce errors, and ensure that claims are processed smoothly. With Kalix, you can manage your Medicare and secondary insurance billing effortlessly, ensuring that claims are forwarded as needed.

This blog post aims to guide you through what you must do to ensure Medicare automatically forwards claims to secondary insurance. Additionally, we will explore whether the GA modifier is required for this process to occur.

Step 1: Complete the CMS 1500 Form Accurately

The first step is to fill out the insurance bill accurately. Ensure that all fields are completed correctly to avoid delays or denials. 

Kalix has data scrubbing functionality, which will detect any errors before the claim is submitted.

Step 2: Indicate Secondary Insurance Coverage

On the manual CMS 1500 form, Box 11D is crucial for indicating that the patient has other health insurance coverage besides Medicare. Here’s how to fill it out:

  • Box 11D: Mark “YES” to indicate that the client has secondary insurance.

Step 3: Provide Detailed Secondary Insurance Information

Accurate and detailed information about secondary insurance is essential. Make sure to fill out the relevant sections with the following details:

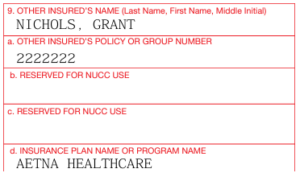
  • Box 9: Name of the secondary insurance policyholder.
  • Box 9A: Secondary insurance policy number.
  • Box 9D: Name of the secondary insurance company.

If you are billing through Kalix, save the clients’ secondary insurance details to their profile. Better yet, request that clients fill out their insurance details for you through online scheduling or their intake forms. They can even upload photos of their ID and the front and back of their insurance cards.   

Step 4: Submit the Claim to Medicare

After completing the CMS 1500 form, submit it to Medicare for processing. Ensure that all information is accurate and complete to avoid any delays. 

Several methods exist to submit claims to Medicare, including the old-school paper submission (avoid using this method if possible) via your MAC’s Portal or billing software (often via a practice management solution like Kalix or a clearinghouse).

Note: MACs (Medicare Administrative Contractors) are regional organizations that process Medicare claims. You can find your designated MAC based on your location and the type of Medicare services you provide. A list of MACs can be found on the CMS website.

Kalix EMR makes the insurance submission process extremely easy by integrating directly with five leading clearinghouses: Assertus, Availity, Claim MD, Office Ally, and TriZetto. You can submit insurance claims to your chosen clearinghouses with just a click of a button without ever leaving Kalix.

Step 5: Medicare Processes and Forwards the Claim

Once Medicare processes the claim, it should automatically forward the necessary information to the secondary insurance company if Box 11D indicates secondary insurance coverage. This automatic forwarding is part of the coordination of benefits process, ensuring that the secondary insurance can cover any remaining eligible costs not paid by Medicare.

Step 6: Follow Up as Needed

After submitting the claim, it’s essential to follow up:

  • Check Claim Status: Monitor the status of your claim with Medicare to ensure it is processed correctly.
  • Secondary Insurance: Verify with the secondary insurance provider that they have received and are processing the forwarded claim.

If using Kalix, you can receive automatic claim status updates and electronic remittance advice against the bill in Kalix without ever leaving the program. 

Part 2 – Understanding Modifiers and the GA Modifier

We often get asked if the modifier GA is necessary on an insurance claim for Medicare to send claims to secondary insurance. Let’s explore this topic further in the rest of this blog.

What is a Modifier?

Modifiers are two-character codes added to CPT (Current Procedural Terminology) or HCPCS (Healthcare Common Procedure Coding System) codes to provide additional information about the service or procedure performed. They help clarify specific aspects of the service, such as the context, extent, or reason for the service. They can affect the way a claim is processed and reimbursed by insurance companies, including Medicare.

What is the GA Modifier?

The GA modifier, “Waiver of Liability Statement Issued as Required by Payer Policy,” documents that a provider has informed a patient about their potential financial responsibility for services Medicare might not cover. This is particularly relevant when a provider anticipates that Medicare will deny a service as not necessary (we hope to explore this topic more in a future blog). The patient is issued an Advance Beneficiary Notice (ABN), indicating they assume financial responsibility.

However, it’s essential to note that the GA modifier is not necessary for Medicare to forward claims to secondary insurance. The primary mechanism for ensuring claims are forwarded appropriately is the correct completion of the CMS 1500 form. Key to this process is indicating the presence of secondary insurance coverage in Box 11D and accurately filling out other relevant fields that detail the patient’s secondary insurance.

It is a common misconception that the GA modifier must be used to facilitate the forwarding of claims from Medicare Part B to secondary insurance. However, this is not the case. The GA modifier’s role is more about documentation and communicating the patient‘s financial responsibility for non-covered services. While modifiers like GA provide important information about the services rendered and document specific interactions regarding financial responsibility, they are not required for the claim forwarding process. 

Conclusion

By accurately completing the CMS 1500 form and indicating secondary insurance coverage, you can ensure that Medicare Part B automatically forwards your claims to secondary insurance. This helps streamline the billing process and reduces the financial burden on patients. Always double-check your forms for accuracy and follow up as needed to ensure smooth processing of your claims. Remember, while modifiers are important for providing detailed information about the services provided, the GA modifier is not specifically required for the claim forwarding process.

Kalix, is designed to simplify your insurance billing process, making it easier for you to manage Medicare and secondary insurance claims efficiently. For more information on how Kalix can help streamline your billing operations, visit our website.

10 Steps to Setting up a Thriving Nutrition Practice

Now that you’ve named your practice, what’s next?  This is where the challenging part begins.  There are several steps involved.

Step 1- Register Your Business

Depending on your selected business structure (read our blog for more info), you may need to file business registration.  We recommend consulting an accountant to obtain the right legal protocol to register your business lawfully.

A great site to refer to is LegalZoom.  They can take the stress off of you by handling any and all paperwork you need to file for a set fee.

https://blog.kalixhealth.com/the-best-business-structures-for-private-nutrition-practices/

Step 2 – Find a Practice Location

Traditionally, private nutrition practices have been purely physical office spaces. But things are changing! With the widespread availability of fast internet and the increased acceptance of telehealth (or virtual meetings) as a mode of communication, many practices are now partially or even wholly virtual. Kalix EMR offers you all of the software needed to run a virtual practice including HIPAA compliant virtual meeting platform, online forms, and paperwork, billing, appointment scheduling, secure messaging and more!

Additional options for appointment locations, (other than the traditional office space) include visiting clients at their homes (i.e., home visits) or public locations, e.g., local library, coffee shop, or even a grocery store.

Please note: when considering non-traditional appointment locations, special consideration must be given to patient privacy. Additionally, if you plan to offer insurance reimbursement, check with the insurance companies what appointment locations are covered. We will cover this topic in more detail in a future blog. 

If a physical office space is for you, we a few suggestions to keep costs down.

  • Find someone in a similar field as you. Offer to pay them a percentage of your profits to sublease a room in their space.
  • Some medical centers, fitness centers, and other professional offices offer shared office space that can be rented on by the hour, or by the day at a reasonable price.
  • Setting up a home office is the most affordable option. With special care and consideration, it could work well for you and your clients.

Step3 – Apply for an NPI number and EIN

A National Provider Identifier (NPI) and Employer Identification Number (EIN)  may or may not be required, depending on your business structure and where or not you decide to take insurance or offer superbills. Registration can be completed online and is free.  Click on the following links to apply EIN and NPI. 

Step 4 – Get Professional Indemnity & Liability Insurance

We recommend that you purchase Professional Indemnity & Liability Insurance. Depending on your business structure, you could be personally liable for your business financially and legally. If your practice is sued, without insurance, your house, savings, and other personal assets may be at risk. 

Step 5 – Obtain a Business Phone Number & Fax

If a phone number doesn’t come with your office location, its worth considering using a virtual phone system. Virtual Phone systems are very affordable to set-up, are flexible, and do not require the purchase of new equipment.

There are lots of companies out there offering these services. Make sure you choose one that is HIPAA compliant. We found Phone.com, RingRx, and RingCentral all provide secure HIPAA compliant VoIP phone systems. These systems allow you to purchase a local and/or toll-free numbers and have calls diverted to your computer, cell or home phone.

If you are looking for a HIPAA compliant fax number, Kalix offers dedicated local and toll-free fax numbers as an add-on to your subscription.

You may also wish to consider a virtual assistance or phone answering service.  We recommend Nutrition Practice Management who will work alongside Kalix EMR.

Step 6 – Build Your Practice Website

This is not as hard as it sounds! These days you don’t need to be able to code to build your own site. There are many website builder sites available that allow you to design a website quickly and easily, no experience required. You can choose a website design for a selection of premade templates. Templates can then be customized with a few clicks of the mouse. You can add or remove pages and choose graphics which represent your practice.

In most cases, this whole process can be accomplished in a single afternoon. Website builder sites are also very affordable, often offering free base subscription plans. Popular options include Wix, Squarespace and Weebly. For a review of various builders, we recommend the following site – The Best Website Builders.

For more information about setting up your website, please see our blog below:

https://blog.kalixhealth.com/four-easy-steps-to-setting-up-a-website-for-your-practice/

Step 7 – Set-up Your Practice Email

Kalix’s Messaging functionality allows you to securely communicate with clients and contacts. Messages can be automated to remind and notify about upcoming appointments, as a reminder to pay outstanding bills, to collect client information via online forms and electronic paperwork), to communicate with other healthcare providers, as well a way to stay in contact with clients on an ongoing basis.

We also recommend setting up your own email address for general inquiries and other communications. Many people do not know this, but it is never a good idea to use general email domains, such as gmail.com and yahoo.com as your professional email address.  Instead, it is worth the time setting up your business email address using your own domain, e.g.  [yourname] @ [yourwebsite]. Having your own personalized email gives a great professional impression on potential clients and makes it easier for anyone to contact you.

You can set up your own personalized email address at the same time that you are creating your practice website. Your selected website builder platform will most likely have the option to purchase your own domain, e.g., nutritionpractice.com. Creating a domain specific email address is also often included as part of their subscription packages. Alternatively, you can set sent-up a professional email from your business web address with G Suite by Google.

Step 8 – Choose A HIPAA Compliant Email Provider

Next, you should choose a HIPAA compliant email provider. Your selected provider will be able to use your personalized email address. To read our recommendations for affordable HIPAA compliant email providers, please see our blog below.

https://blog.kalixhealth.com/how-choose-to-the-right-compliant-email-provider-for-your-private-practice/

Step 9 – Create Business Cards and Other Promotional Material

Create and order professional business cards and other promotional materials, e.g. flyers.  The keyword here is professional.  Ensure you create promotional material that sets you apart from others in your field and stands out.  Some online sites that have excellent tools include VistaPrint and Moo.

Step 10 – File with ‘Google My Business’

We also recommend creating a listing for your business with Google My Business. It is free, and you get to decide how your private practice appears on Google Search and Maps. Your clients can also leave online reviews, and you can respond to them.

Stay tuned for next week’s blog as we discuss the importance of networking and the power it holds!

3 Ways Dietitians Can Increase Follow-Up Appointments

Today, it is common practice for providers to schedule a follow-up appointment before the client has even left the office. But that doesn’t stop the no-call, no-show clients who wreck your calendar and make rescheduling a hassle. So how do you put a stop to this lack of follow through?

Explain the need for follow-ups

While this may seem obvious to most, follow-up appointments are often lost in the wealth of information provided to the client during appointments. In addition to ensuring the client knows what to expect from their next appointment, think about also creating email follow-up sequences as well. For example, practice management and electronic health records such as Kalix gives the ability to securely contact clients at any time via its ad hoc messaging functionality.

Automate your follow-up reminders

Cater to your clients by giving them information about their follow-up appointments using their preferred contact method. Text messages, emails, and phone calls are all great ways to reach out. Make sure you’re using a HIPAA secure program for your messaging to ensure confidentiality! Kalix’s automated appointment reminder functionality will remind your clients of their upcoming appointments with zero effort from you.

Make it easy for clients to reschedule

For many different reasons, people need to reschedule their appointments. By having a 24/7 calendar available online, clients can reschedule at their own convenience, at any time of the day or night. This makes scheduling uncomplicated and less time consuming for you. Kalix’s Online Scheduling feature allows you to add a widget to your practice’s website so that you can accept bookings 24/7. All bookings will sync with your Kalix appointment calendar.

There are many different ways to ensure that client follow-up with their healthcare providers. While there are many free software programs which can accomplish these tasks, they often add steps to your process and are not HIPAA Compliant. When looking for innovative solutions, be sure to seek a practice management system that will simplify your scheduling and revolutionize the way you conduct business.

Legal Considerations When Using Online Electronic Signatures

Kalix makes it easy for your practice to go completely paperless. Being able to securely share paperwork and collect electronic signatures online is now paramount for the modern healthcare practice. Kalix’s extensive template library includes many electronic agreements and notices including HIPAA forms, practice policies and Advanced Beneficiary Notices of Noncoverage (ABN). Alternatively, set up your own contracts using our blank templates. Through Kalix, share online patient agreements with only a few clicks of the mouse.

Unlike collecting and witnessing a written signature during an office visit, sending and collecting patient signatures online, can hold some additional legal considerations. This article will discuss these further.

Legal Considerations

What is an Electronic Signature?

An electronic signature is any electronic means that indicates either that an individual agrees to the contents of an electronic document, or that the person who claims to have written a document is the one who wrote it.

A signature can be any symbol made with the intent to authenticate a record or contract that is both:

(a) attached to or logically associated with a contract, e.g., service contract, form, e.g., consent form or record, e.g., chart note; and

(b) executed or adopted with the intent to sign the record.

This means that an electronic signature can be (without limitation):

  • typed;
  • clicking a checkbox
  • stylized script e.g., a written signature
Are Electronic Signatures Valid?

Most US states give electronic signatures the same legal effect as traditional signatures.

We suggest you all the following statements on your forms to show that there is an intent to conduct their relations electronically:

You agree that the electronic signatures included in this [form/ consent/contract] are intended to authenticate this writing and to have the same force and effect as manual signatures.

Electronic signature means any electronic sound, symbol or process attached to or logically associated with a record and executed and adopted by a party with the intent to sign such record, including (without limitation) typing a name or clicking a checkbox.

Proper Processes and Controls

The complication of using electronic signatures is authentication of the person signing. You need to satisfy yourselves of “non-repudiation” – i.e., ensuring that data really is from the designated client, not someone else, so that the client cannot deny signing the document in the future.

Please remember, you need to verify the identity of the client signing
This can be by asking multiple questions in the form, such as the patient’s date of birth, mother’s maiden name, social security number, driver’s license number or demographic information. You should then compare the answers in the submitted online form against another source, e.g., referral letter, driver’s license, health insurance card.